Taggin’ with Louis C.K.

17 December 2011
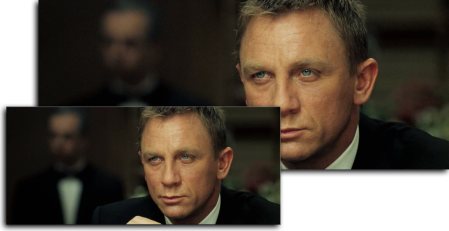
Louis C.K. Live at the Beacon Theater

Louis C.K. Live at the Beacon Theater. Click to enlarge.

I just got on this bandwagon. Louis C.K. is doing something pretty special with this special. I bought it, expecting to download an SD 640 x 360 video file, probably in H.264. I was pleasantly surprised to find that there were two sizes available, 720p and a just-under-NTSC 800 x 448 SD version, both in an iTunes-friendly H.264/AAC format. I downloaded both. They were not prepared for iTunes, so I figured this was a perfect opportunity to create a tutorial on the subject.

The two files will become what I call a “HD•SD” package, which is an iTunes Store standard that includes a 720 HD file and an SD file. They appear as one item in iTunes with a HD•SD badge:

Appearance in iTunes

Appearance in iTunes

Mr C.K. was canny enough to provide an actual DVD label on his site, so I didn’t have to cobble together art. I downloaded the PDF, cropped it, resized it, added a little black at the bottom to get my 1000 x 1500 pixel ratio, and saved it as a new file. You can download it from here.

We then open both files in Subler. Edit one, then copy the tags to the other. I’ll start with the HD version. Click the Other Settings tab:
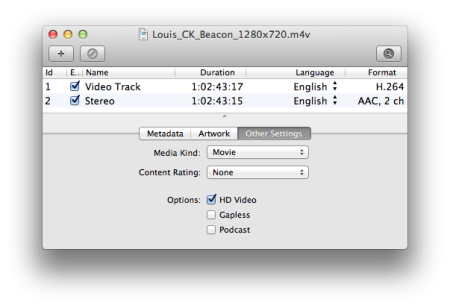
Editing, Stage 1

Editing, Stage 1

Change the Media Kind to Movie. Because this is the HD version, check the HD Video checkbox.

Click the Artwork tab and drag in your edited artwork file:
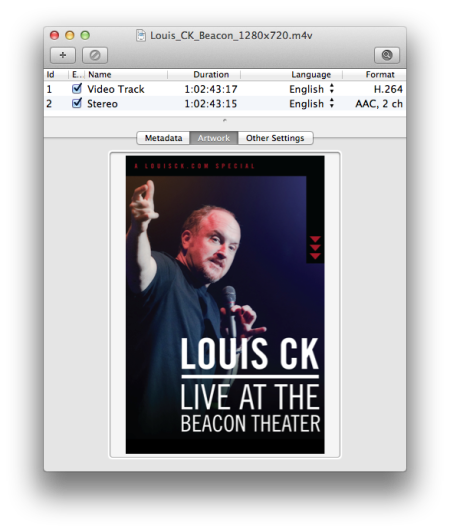
Editing, Stage 2

Editing, Stage 2.

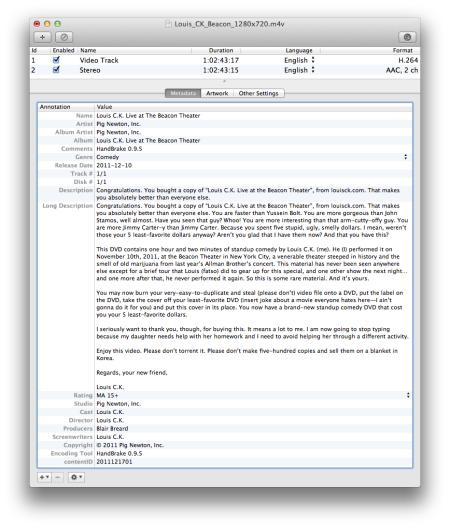
Finally, we fill out the tags. Special notes:

  • All the data for the tags came from Louis’ site and the DVD label. You can download a PDF from here that contains all the data for the below tags.
  • The Artist, Album Artist and Studio are all the same: the name of the studio, in this case, Pig Newton, Inc.
  • I like to put the encoding tool in the Comments tag so that I can use playlists to find videos encoded with HandBrake 0.9.5 (you can’t use the separate Encoding Tool tag as a criterion). Interestingly enough, Encoding Tool was the only tag these files originally had, and the value was HandBrake 0.9.5, so Mr. C.K. uses the same tool that I do!
  • I’ve used the Australian rating that I guessed applied, which is MA15+. Choose the appropriate rating for your country.
  • The tag contentID is a unique code that the two files must share. iTunes sees this code and knows that it must bundle the two files together. I use the date, followed by a sequential number, so for the first set that I tag on 17 December 2011, it becomes 2011121701. The second set of two will become 2011121702, etc.
Editing, Stage 3

Editing, Stage 3. Click to enlarge.

Do the same process for the SD version, except you won’t check the HD Video checkbox. Select All of the tags in the Metadata tab, copy and paste into the other window. Save both and drag them into iTunes where they will be filed appropriately.

I tested the files, too. The HD version works on the old Apple TV, the Apple TV 2 and the iPad (and will also work on the iPhone). The SD version will not sync to a Classic, unfortunately, but given that I never watch movies on my Classic, it’s no great loss. You’ll use the SD version on your iPhone or iPad to save space.

I hope this is useful to all who buy the special and is my contribution (other than payment) to Mr. Louis C.K.’s grand experiment.

Roll Your Own Anamorphic iPod-Compatible Videos from Blu-ray

27 August 2011
HD and SD Versions

HD and SD Versions (click to enlarge)

My job has changed recently and now involves travel, so suddenly I have a use for SD versions of videos. Previously I would only rip a HD version of a Blu-ray.

The iPod Classic is the reference device for SD video in the iTunes ecosystem. It has an ostensible limit of 640 x 480 pixels. This can be stretched to 855 x 480 with the anamorphic flag switched on. This is possible to do with anamorphic DVDs in HandBrake.

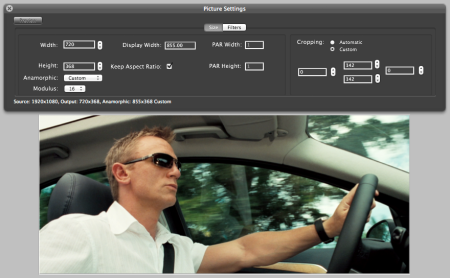
However, Blu-ray is natively widescreen, 1920 x 1080, so there’s no such thing as anamorphic ratios. In order to produce an iPod-compatible anamorphic video, you have to tweak the dimensions. Here are the settings for this movie, which is in an aspect ratio of 2.40:1:

HandBrake Settings

HandBrake Settings (click to enlarge)

I used the Universal preset. The result:

Result in iTunes

Result in iTunes


TV Rotation Technique Redux: the “Blue Dot” Technique

17 February 2011
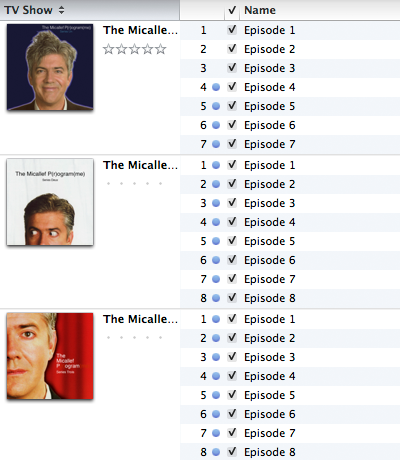
TV Show with Blue Dots

More obscure TV: The Micallef P(r)ogram(me), with unwatched episodes indicated by blue dots

A lot has changed in the Apple TV space since I first wrote my TV Rotation Technique. A friend of mine got the new Apple TV and started to manage his TV shows by “the blue dot”, the indicator that iTunes uses to indicate that an episode has not yet been played. On the new Apple TV, you see every single episode and he uses the blue dot to tell which episode is next to watch in sequence. Once he’s finished all episodes, he selects them in iTunes, right-clicks and selects “Mark as Unwatched”. Then he starts again.

I use the old Apple TV for watching TV shows, for 3 reasons:

  • I sync only the content I choose, which isolates only the next few episodes to watch. This way, they can either be watched or unwatched, and I only ever see the next few in sequence, as per my TV Rotation Technique.
  • The new Apple TV displays every season in the TV Shows menu, making it a mammoth list. The old Apple TV displays only the shows, then all the seasons within the show in a submenu. I prefer this as the menus aren’t as long, especially as it’s not showing every show, every season, every episode.
  • The new Apple TV randomly chooses one of the many different pieces of episode artwork that I apply to the individual episodes and uses that for every episode. Given the work I put into those, that’s annoying.

I’ve started to trial my friend’s Blue Dot technique. It has certain merits. It’s no more effort to maintain than is mine–less, in fact, considering it’s easier to find a TV show in the TV Shows library than it is to burrow down through my playlist folders to the specific playlist. It’s more obvious. It overcomes the problem of having cycled through seasons 1 and 2 two times, then you add season 3 and have to tweak the Plays is less then X criterion in my playlists. You don’t have to use playlists.

Not that I have a real use for it, but I’ve been obsessed with collecting and retaining what I call “audit data”, which is data relating to the playback of files, i.e., Date Last Played and Plays. This is not used in Blue Dot, although I do use it in my technique. I notice that marking episodes as new does not clear or otherwise modify the Date Last Played, so that’s given me a little more confidence to trial it.

The technique is very simple. For new Apple TVs, add content, which is unplayed, then play it. Once all episodes are played, select them in iTunes, right-click and select Mark as New. Begin watching again from the first blue-dotted episode. This also applies to old Apple TVs where you’re streaming everything from the computer.

For old Apple TVs, or even iDevices, where you are syncing only certain content, choose a number of episodes to sync based on how much storage you have. I’ve chosen 10 from all shows. Set the setting like so:

TV Shows Sync Setting

TV Shows Sync Setting (Click to enlarge)

Now you’ll get 10 unwatched episodes, from as early as possible in the season sequence, from every TV show. In my Micallef P(r)ogram(me) example above, episodes 4-7 of series 1 and 1-6 of series 2 currently reside on my Apple TV.

If you’ve watched a series and you don’t want it to reappear in the Unwatched Episodes view in the Apple TV or on the Apple TV at all, simply don’t blue-dot it until you’re ready to watch it again.

I’ll be trialling this, mostly because I’ve used my old technique for so long that I’m used to it, but I see it as inevitable that it will be an easier method. Sync options certainly have evolved since I started working on this problem.


What’s Been Happening Recently

16 February 2011

It’s been a while and lots of new iTunes and iDevices news has come and gone. I’m still working away diligently, building my collection and rocking the new HandBrake 0.9.5. This version produces such good results that for DVD, I’ve decided I’m not going to rerip any 0.9.5 video with future versions.

I’ve abandoned all other metadata taggers and am exclusively using Subler. This is the supreme application for this task.

I’ve started to rip Blu-ray and the results are pretty good, but I’m getting some blockies in dark regions of the image. When, as I predict, the Apple TV will support 1080, I will rerip them for 1080 and hopefully be able to increase the bitrate.


Square TV Art Revisited

22 August 2010

Following up my earlier post on this, I’ve now made a complete move towards square art with a footer containing the name of the TV show. I don’t know why I didn’t do this earlier. It looks so much neater than just a screen shot, because it’s always a uniform size and the footer helps with identification.

With screen shots, you’re dealing with either 4:3 or 16:9 aspect ratios (Star Wars: The Clone Wars is a rare exception–it’s presented in 2.35:1). I settled on an 800 x 800 pixel size. This allows me to scale up or down a moderate amount so as not to introduce too many artifacts. I use a footer of 300 pixels high for 16:9 content (576p scales down a little) and 200 pixels high for 4:3 (576p scales up).

I usually use a solid colour for the footer and this is sampled from the artwork that I use for the whole season. Here’s an example:

Frisky Dingo, Season One

Frisky Dingo, Season One (Season Art)

Frisky Dingo, Season One, Episode 4, "XPO"

Frisky Dingo, Season One, Episode 4, "XPO" (Episode Art)

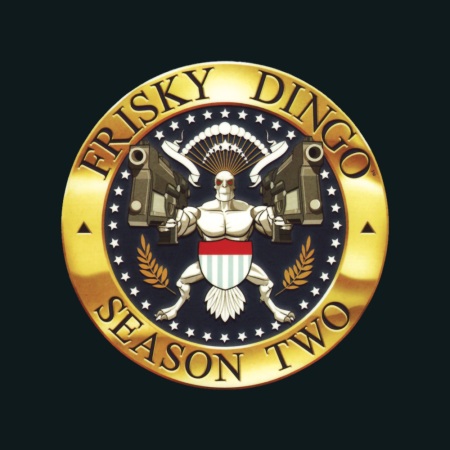
Using a sampled colour connects the season and the episode art visually. When the season art changes, so does the footer:

Frisky Dingo, Season Two

Frisky Dingo, Season Two (Season Art)

Frisky Dingo, Season Two, Episode 8, "The Debate, Part Two"

Frisky Dingo, Season Two, Episode 8, "The Debate, Part Two" (Episode Art)

It’s more work, of course, but once I’ve set up the image as a Photoshop file with the footer and the TV show title, I can then bring in my screen shots as separate layers and save out as JPEG files. That keeps all the working files together in one file, with separate output files.

You can see all the Frisky Dingo artwork on my artwork site, Album-Art.net.


iPad Won’t Sync TV Shows Above 480p

11 May 2010

Pretty annoyed that the iPad won’t sync my 576p TV shows, but it will sync movies ripped using the same specs. I didn’t expect this because the iPad has the same specs as the Apple TV, which will sync these.

Update: After a recent update to the iPad software, the videos I had trouble with now sync, so it seems to have been an iPad iOS issue.


Embracing the iTunes Square TV Artwork Format

2 May 2010

I don’t know why Apple chose a square format for TV artwork. Perhaps it was to distinguish TV video from movie video, for which they use a poster-like 1:1.5 ratio format.

I’ve fully embraced the square TV format because all of Apple’s devices expect it. It helps in my scanning of DVD covers, too, because here in Australia, every cover has the rating label printed on it, ruining the bottom edge. By scanning square, I can omit this section.

I’ve seen a screen shot of video on the iPad and the TV shows are displayed as thumbnails, with no text label. The person who posted it was annoyed because they couldn’t tell what the shows were. This is because he had provided his own video (not purchased from the iTunes Store) and had not used custom artwork. I can understand this. Apple intends that you buy TV shows from the iTunes Store. Every episode on the store has the same artwork. You can tell what the show is, any episode, by looking at the artwork on the iPad.

I’ve taken a different approach to the TV shows I make from DVDs. I scan the cover for the episode art, then take a screenshot from every individual episode. Every episode therefore has unique art. This helps to identify the episode but is also the best possible way to immediately refresh your memory as to the episode content for those you’ve watched in the past, or to pique interest in those you haven’t. Traditionally, I’ve retained the native aspect ratio, i.e. 16:9 or 4:3.

Getting back to Apple’s love of the square art, I’ve begun experimenting with squaring of the episodic artwork:

"American Dad", Season 3, Episode 13, "Red October Sky"

"American Dad", Season 3, Episode 13, "Red October Sky"

This was from a 4:3 screen shot. Cropping seems to work in almost all cases, although my experiments have been limited to American Dad, Volume 4 so far.

I recently picked up an unusual Australian TV show, Stories from the Golf. Each episode is 5 minutes long and I didn’t think that there was much to take a screen shot of, especially as there was a beautiful piece of art for each episode in the DVD menus. I took screen shots of each. None of them conformed to a particular aspect ratio, so I worked them into a 600 x 450 image. Then I had the idea to add a footer, into which I put the TV show’s name:

"Stories from the Golf", Episode 7, "Karaoke Roadie"

"Stories from the Golf", Episode 7, "Karaoke Roadie"

This has started a whole new chain of thought. I’m now experimenting with combining screen shots with a similar footer:

"Very Small Business", Episode 1, "Basics of Team Building"

"Very Small Business", Episode 1, "Basics of Team Building"

I had to crop the 16:9 image slightly to 800 x 500. There is a 300-pixel footer. This gives me the best of both worlds-screen shot and identification, all in a square package. I’ll keep doing this for a while to see if I still like it. It’s a radical change.

You can pick up the episodic art for these shows from my album-art website:

American Dad

Stories from the Golf

Very Small Business


iTunes 9.1’s Down-Convert Feature is a Game Changer

31 March 2010

I use a 160Gb iPod Classic at work. It has all my music on it. I decided a while ago to “go lossless” and have ripped every new disc as Apple Lossless ever since. I’ve also upgraded a number of previously ripped discs. The result is that I’ve had to drop all music videos from the sync as they wouldn’t fit and I’m down to 10Gb free.

Enter iTunes 9.1 with the “convert-to-128-Kbps-for-any-iPod” feature. This simple feature, long missing from iTunes, has completely changed my iPod plans this year. I was considering buying a second Classic but didn’t like the idea of splitting the library. The whole charm of the big Classic is to take your whole library with you, one of the key tenets of the original iPod. Now I don’t have to buy another Classic. If Apple releases a bigger Classic this year, it won’t be as compelling as it once was.

That leads me to my next point: this simple feature could have an impact on the iPod line-up this year. This may be the year that the Classic iPod is discontinued. Apple’s got the perfect excuse. You’ve got this compression feature now, so you can squeeze everything onto a smaller device. For the minority like myself who deal in lossless files, we can get everything onto a Classic. Why should Apple continue the Classic in the face of this?

I should mention that I’m probably not a conventional user. I can play music at work. While I appreciate quality, I wouldn’t know the difference at work because the music is played at a low volume through average speakers. Therefore, this feature is perfect for me. I can pick and choose which devices should have down-converted files. For instance, I wouldn’t down-convert on my Nano because that’s something I listen to exclusively through headphones.


iTunes Backup Feature

19 February 2010

iTunes has a great feature: iTunes Backup. You can select a playlist or the whole library and can back it up to multiple DVDs. The problem is with the restoration. I’ve had this happen twice. In one case, I had the discs and a Mac and one disc would keep failing. I dumped the contents to a hard drive and copied them into iTunes that way. The other situation was with a Windows machine. I’m wondering if in this situation it was a filename-length issue. The files were created on Mac-formatted drive and he was restoring to FAT32. I overcame that with the hard-drive method. iTunes won’t tell you which file failed, either, so a whole disc is suspect when it fails.

The files themselves aren’t faulty. When you insert an iTunes Backup disc, it will appear in iTunes and you’ll be asked if you want to restore. If you ignore this, you’ll see that it’s a standard disc in the Finder or Windows Explorer. iTunes adds a little magic somehow to identify it as an iTunes Backup disc. To do the hard-drive trick mentioned above, I simply copied to a hard drive, then copied from the hard drive to iTunes. This will definitely bypass the disk-format issue if you use the same drive for both the copy and iTunes. If a file fails, your OS should give you some sort of explicit error for a specific file that you can correct, like “filename too long”.

The other annoying thing about this feature is that it mixes up all the content, so you may have the tracks of a single album strewn over more than one disc. My only theory as to why is that iTunes is trying to maximise how much it can get on a single disc and sticking to a strictly sequential order may leave unused space. This doesn’t matter if you intend to restore the lot and the feature works!

So Apple has a very good feature for the initial part of the operation, but the critical part, restoration, is sadly lacking. Use with care.


An overlooked iTunes 9 Feature

23 September 2009

I’m surprised that I still haven’t read someone mention this. In iTunes 9, if you create a new library, the title in the title bar changes to that library’s name. Here’s the default library:

iTunes Default Title

iTunes Default Title

Here’s a new library:

iTunes Alternate Title

iTunes Alternate Title

It’s a nice detail. I’m ripping someone else’s library at the moment and it’s how I keep our music apart.