TV Rotation Technique Redux: the “Blue Dot” Technique

17 February 2011
TV Show with Blue Dots

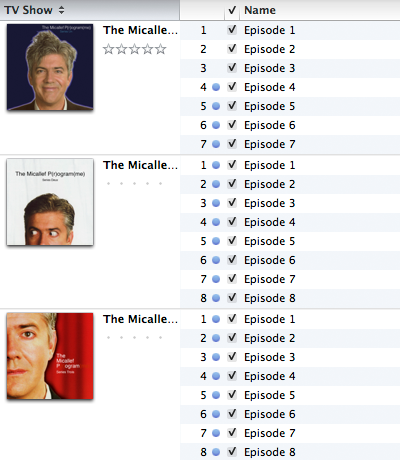
More obscure TV: The Micallef P(r)ogram(me), with unwatched episodes indicated by blue dots

A lot has changed in the Apple TV space since I first wrote my TV Rotation Technique. A friend of mine got the new Apple TV and started to manage his TV shows by “the blue dot”, the indicator that iTunes uses to indicate that an episode has not yet been played. On the new Apple TV, you see every single episode and he uses the blue dot to tell which episode is next to watch in sequence. Once he’s finished all episodes, he selects them in iTunes, right-clicks and selects “Mark as Unwatched”. Then he starts again.

I use the old Apple TV for watching TV shows, for 3 reasons:

  • I sync only the content I choose, which isolates only the next few episodes to watch. This way, they can either be watched or unwatched, and I only ever see the next few in sequence, as per my TV Rotation Technique.
  • The new Apple TV displays every season in the TV Shows menu, making it a mammoth list. The old Apple TV displays only the shows, then all the seasons within the show in a submenu. I prefer this as the menus aren’t as long, especially as it’s not showing every show, every season, every episode.
  • The new Apple TV randomly chooses one of the many different pieces of episode artwork that I apply to the individual episodes and uses that for every episode. Given the work I put into those, that’s annoying.

I’ve started to trial my friend’s Blue Dot technique. It has certain merits. It’s no more effort to maintain than is mine–less, in fact, considering it’s easier to find a TV show in the TV Shows library than it is to burrow down through my playlist folders to the specific playlist. It’s more obvious. It overcomes the problem of having cycled through seasons 1 and 2 two times, then you add season 3 and have to tweak the Plays is less then X criterion in my playlists. You don’t have to use playlists.

Not that I have a real use for it, but I’ve been obsessed with collecting and retaining what I call “audit data”, which is data relating to the playback of files, i.e., Date Last Played and Plays. This is not used in Blue Dot, although I do use it in my technique. I notice that marking episodes as new does not clear or otherwise modify the Date Last Played, so that’s given me a little more confidence to trial it.

The technique is very simple. For new Apple TVs, add content, which is unplayed, then play it. Once all episodes are played, select them in iTunes, right-click and select Mark as New. Begin watching again from the first blue-dotted episode. This also applies to old Apple TVs where you’re streaming everything from the computer.

For old Apple TVs, or even iDevices, where you are syncing only certain content, choose a number of episodes to sync based on how much storage you have. I’ve chosen 10 from all shows. Set the setting like so:

TV Shows Sync Setting

TV Shows Sync Setting (Click to enlarge)

Now you’ll get 10 unwatched episodes, from as early as possible in the season sequence, from every TV show. In my Micallef P(r)ogram(me) example above, episodes 4-7 of series 1 and 1-6 of series 2 currently reside on my Apple TV.

If you’ve watched a series and you don’t want it to reappear in the Unwatched Episodes view in the Apple TV or on the Apple TV at all, simply don’t blue-dot it until you’re ready to watch it again.

I’ll be trialling this, mostly because I’ve used my old technique for so long that I’m used to it, but I see it as inevitable that it will be an easier method. Sync options certainly have evolved since I started working on this problem.


The Perfect Cafe Playlist

24 February 2009
Kash Cafe, Surry Hills, Sydney

Kash Kafe, Surry Hills, Sydney

The following plug won’t make any sense to people who don’t frequent the Surry Hills suburb of Sydney, but I’ll go ahead anyway. I’ve become friends with the proprietors of my favourite cafe, Kash Kafe, and it has given me the opportunity to devise a solution for someone with different needs to my own, which has been refreshing.

Let me make a number of assumptions: you play music only (no other audio type and no video). You use an iPod connected to an audio system that has a remote which gives you control over play/pause, fast forward/skip and rewind/skip back. The iPod is of reasonable capacity, i.e. 20Gb or more.

Let’s start with the desired music style. What do you want to play at your cafe? Chillout? Doof-doof? Rawk? Decide on a style. If your music library consists of nothing but that style, you won’t have to think about this first step.

Once you’ve decided on a style, you’ll need to filter that style of music out of your library. Easiest way to do this is by genre. For example, if you want chillout music, your first criteria will be Ambient, Electronic, R&B, etc. This is highly subjective (refer to my previous post on genre) but use whatever works for you. The selection will get more accurate over time.

The next factor is frequency. You don’t want to hear the same song every day, so we include a time-based criterion which excludes songs played within a certain timeframe. If you’ve got a lot of music, make it a month. If less, perhaps 1 week. While playing the playlist, if you notice that songs repeat a little too often, increase this timeframe. I’m assuming that a mixture of music, i.e. randomised, is desired.

You’ll want at least a day’s worth of music, so err on the generous side and specify 2 hours more than your open hours. If you don’t sync your iPod daily, then add one day’s worth for every day you don’t sync. For example, if you take your iPod home for syncing every 3 days, and each day you open for 6 hours, then you need 8 hours per day for 3 days = 24 hours.

Your selection of tracks won’t be perfect initially. Occasionally a raucous number will impinge on your quiet or a slow song will interrupt a perfectly thumping good time, depending on your taste. We need a mechanism to exclude these over time.

On top of it all, perhaps you only want songs that are above a certain rating. This presupposes that you have taken the time to assign ratings to a sufficient percentage of the songs to make it worthwhile, not easily done in a busy cafe! However, using a technique I will outline, you can get a general approximation of rating over time.

The Key

The key to my proposed system is the use of the forward skip functionality on the iPod. If you skip forward, this fact is recorded on the iPod and after syncing, in iTunes. The date and time the track is skipped and an incremental count is stamped on the song. From this information, certain assumptions can be made. The first is that the song is not liked or is not suitable for playing in the cafe. A small margin of error needs to be included to account for incorrect button-pressing or mood swings. If the skip count rises above a certain number, we can assume that you don’t want that song to appear in the cafe again.

Secondly, the lack of Skip Count but high incidence of Play Count (the song has played from start to finish) indicates that you like the song or that it is appropriate because you didn’t skip it.

Over time, songs that have been played through a certain number of times but skipped below a number of times are candidates for rating, which can be done on a number of songs in one action.

The busy cafe operator does not have time to rate songs on the fly nor to make decisions beyond “I don’t want to hear that now”. The skip forward button is all they need to increase accuracy over time.

The System

A set of Smart playlists are employed as it can’t be done in one playlist in iTunes.

Begin by creating a new folder called Cafe (File > New Playlist Folder) to keep these playlists together and organised.

The first playlist is entitled Cafe Music Genres. The purpose of this playlist is to gather together all the songs with the genres you want. The other playlists will use this pool of songs from which to create a day-to-day playlist. Select New Smart Playlist… from the File menu and configure thusly:

Cafe Playlist Source (Click to enlarge)

Cafe Music Genres Playlist (Click to enlarge)

The second playlist is called Cafe Music. This playlist adds the other criteria we need to produce the playlist that you sync to your iPod on your routine. Here I’ve assumed a moderate library (5000 songs) for a one-week repeat cycle and an 8-hour selection, which is assuming that 8 hours is a day’s worth and the iPod is synced daily. I’ve also filtered out any music videos that you might have, because you won’t be watching video. The Music Videos playlist is preconfigured when you install iTunes.

Cafe Music Playlist (Click to enlarge)

Cafe Music Playlist (Click to enlarge)

Additionally, the following playlist will show you all the unrated songs that you “like” (based on number of times fully played and a low number of skips). Select all the songs and select File > Rating > (desired rating) to rate them all at once. They will disappear from the playlist as they have now been rated. You can check this from time to time as songs appear.

To Be Rated Playlist (Click to enlarge)

To Be Rated Playlist (Click to enlarge)

Here is your neat little package of playlists. Click each playlist and drag it into the folder:

Cafe Playlist Folder

Cafe Playlist Folder

Once you’ve set up the system, other than a small amount of tweaking at the start, it should be good to use daily without further interference. I hope this system inspires operators of cafes and similar environments (hairdressers, restaurants, etc.) to provide a better mix of music.


Managing the iTunes Plus Upgrade Process

3 February 2009

If you haven’t modified any of the tags for the music you previously bought from the iTunes Store, then the tags for the Plus replacements should match. The Plus tracks will have a new Date Added but otherwise will appear the same. The average user will be unaware of the change.

Fiddlers like myself will get into trouble if they simply do an upgrade as the tags won’t match. I always make sure my purchased music has a release date, that the album name and track number is correct (free song-of-the-week titles are usually wrong). I complete the tagging of music videos (usually they have a name and little else). I may replace the album art with one of my superior scans. You get the idea. Here are my recommendations for upgrading, all of which I followed in my own recent upgrade.

Download on a Different Computer or Library

My library is on my desktop machine. I downloaded on my laptop, which I use as a workspace to tag music before I merge it with the main library. The laptop is authorised for my iTunes Store account as is the desktop. The songs to upgrade are tracked by the Store from its own records, not based on the presence of any tracks in the library you are working with, so you can download to a different computer, even if the original songs are not there.

Alternatively, if you don’t have a secondary computer to work with, you can create a new, separate library to download to. Quit iTunes, then relaunch while holding down the Option key (Mac) or Shift key (Windows). This will bring up a dialog where you can choose an existing library or create a new one. Create one on the desktop for ease of finding in a later step. Log into the iTunes Store, click the iTunes Plus link, buy what you want (you can select what you want to upgrade now–you’re not forced to upgrade everything) and download it.

Merging with the Main Library

In this step you’ll add the new files to the existing library for checking against the originals.

If you’re using the double-library approach, quit iTunes and relaunch while holding down Option or Shift. Choose the main library. Once iTunes has launched, create a new static playlist called iTunes Upgrade. Open the iTunes library folder on the desktop. Burrow down to the iTunes Music folder and drag that folder into the new iTunes Upgrade playlist. If you downloaded on another machine, get the files across by any convenient method and drag into the playlist. As soon as one track has finished copying, hold down the Command key (Mac) or Control key (Windows) and click the checkbox next to the name. This will uncheck all the tracks and prevent them from being synced to your iPod or Apple TV before you’ve finished editing them.

Editing the Tags

Now you’ve got two sets of files: the original 128kbps protected files and the new 256kbps Plus files. Sort the playlist by Album and find the first album in the main body of the library. Change the tags of the Plus song to match that of the Protected song if necessary.

Empty the trash. Click the Plus song and delete it. Don’t empty the trash. Right-click the remaining original protected song and select Show in Finder (Mac) or Show in Windows Explorer (Windows). This will open a window with the actual file location of the song. Drag the Plus file out of the trash and put it in the song folder. Throw the protected file in the trash and empty it.

Now you’ve broken the link to the song in iTunes because you’ve deleted the file but not the database record. We do this to preserve the Date Added value, because this cannot be changed unlike other values such as Date Last Played.

Click on the song and Get Info. iTunes will tell you it can’t find it and ask if you want to locate it. You do. Navigate to the Plus version in the original location and click the Open button. Now you’ll see the Get Info dialog for that song. iTunes will also update the record to reflect that the song is now 256kbps but other metadata such as Last Played, Play Count, Rating and of course, Date Added are unchanged.

Special Considerations

This is the main procedure. You may find that the original tracks are no longer available and you may be offered an alternative, or (theoretically) they will be ignored in the upgrade process. For more on this, refer to my earlier post.

Be careful with the Finder/Explorer hack, especially the step where you choose the “lost” file. If you choose the wrong one you’ll change the record in iTunes and you’ll have a duplicate on your hands. Fixing it is messy. You would have to select the two duplicate records and delete them, which will put the file in the trash. Drag it back into iTunes and you’ll recover it to the original album, but you’ll lose all that lovely metadata for both the original song and the one you were trying to map. You’ll have to also drag the song you were trying to map to into iTunes.

Summary

I’ll admit that it’s a bit of work and if you have bought an awful lot of songs it probably isn’t worth it, but for perfectionists like myself who haven’t bought much, I think it’s a good idea from the perspective of maintaining valuable metadata.


Net Labels: Free Music for the Taking

16 October 2008

A net label is a website that offers free music. It is distinguished from a site that offers a random selection of tracks by these factors:

  • The music is organised into titles, analogous to singles, EPs, albums and compilations
  • Often the work of a single artist is the subject of a title
  • Artwork accompanies the title, often of high resolution and intended for printing, so that jewel cases can be created for the title if burned to CD.

The music is given away for free. There are a number of reasons for this. The artist doesn’t want to release commercially, they are a hobbyist, the free work is promotional, etc. This means it’s legally free and legal to give to others. Often a Creative Commons licence is employed.

Those raised on a diet of commercial music will ask if the music is any good. In my opinion, the music from net labels is often very good in terms of skilled technical execution and aesthetic appeal. Rarely do I feel that a track is amateur. The point of the net label is to treat an artist’s music with respect and thus the resemblance to a commercial label operation.

I like music I can chill out to, so I have focussed on net labels that provide this type of music. Here is a list of sites that I consider to be the best.

  • Alpine Chic: Swiss electronica at its best.
  • iD.EOLOGY: German electronica, dub and hip hop.
  • Mercedes-Benz Mixed Tape: Awesome ephemeral compilations released every six weeks. A marketing vehicle for Mercedes, promoting it as a lifestyle brand. Each compilation is a mix of electronica, pop, RNB and hip hop, sometimes featuring known artists, but mostly a platform to present up-and-comers. As each new compilation is released, the previous is deleted, so these are collectables.
  • Jahtari: Amazing blend of low-tech computer music and reggae and dub. It really works.
  • Lo-Kiwi: Electronica.
  • Petit Poulet Records: Electronica.

These sites vary in that they can be considered net labels for individual artists, in other words, their own label. They still present their music in titles, so I consider them net labels.

These sites are still good, but I don’t always like the music. That’s just my opinion of course. The music still has that skilled technical execution, so it’s still good.

  • Monotonik & Friends: Huge repository of electronica and glitch/bleep (scratchy-sounding music created with low-tech computers). The titles vary widely in style, thus I don’t like everything on the site.
  • Autoplate/Thinner: Sister sites that specialise in glitchy electronica.
  • Electrobel: Electronica, some glitchy.
  • Offaudio: Spanish site. Beatier, dancier electronica.
  • One: Electronica.

Tagging is the one area in which they fall down. The tags are incomplete and lack artwork. Artwork is supplied separately, of course, except in the rarest of situations, and can be reformatted for use as album artwork. The Mixed Tapes are the worst, because the album tag is different for every song and the compilation flag is not used. I like fixing these tags, however, and this, in combination with my dissemination of the music, is my contribution to their efforts.

To keep track of the various releases, I tag the Grouping field with the website and the release number. Often there will be a specific release number, such as iD049 (iD.EOLOGY). If none, I number from the earliest, starting with 01. A title may end up with a Grouping tag something like this: http://www.ideology.de (iD049). I then create a smart playlist that looks for all tracks with http://www.ideology.de in the Grouping field, and that’s my iD.EOLOGY playlist.

Net labels have serious works available to you for free. Use them well to greatly expand your music library.


Your Music in Microcosm

10 October 2008

Do you have multiple iPods? Apart from my great love of them, driving me to collect them (I have a policy of always having the latest complete set of iPod models, broken only this year because there was no replacement for my 160Gb Classic and I got the iPhone instead of the Touch), my media library got so large that different types of iPods became a good idea.

My 160Gb Classic has every last music track on it, plus every music video (over 500). I play this at work. The beauty, of course, is the essence of the earliest iPod concept–carry all your music with you. It can be hard to select something to play. I use playlists, shuffling the whole contents and Cover Flow to aid me in this. I just wish I could get the Genius feature without having to downgrade my storage.

My Nano (8Gb) and iPhone (16Gb) necessarily cannot store much. Because of this, I have chosen to keep only the most recently added music on them. I have a playlist that keeps track of this and which forms the basis of what is to be synced. Here are the criteria:

(Click to enlarge)

This takes all the guesswork out of what to put on the iPod/iPhone. Seeing as the music is new, I probably haven’t heard it yet or it’s my latest groove-thang, so it will be at the forefront of my attention. This is another reason why I chose to add only the most recent music.

I find it interesting how much nicer it is to have this small selection of music as it is much easier to comprehend and to choose what to play.

If you have only a small-capacity iPod and you are wondering how to fill it, I recommend the last-added playlist as above.


When “Most Recent Unplayed” Makes Sense

7 March 2008

I eschew this option for TV Shows because I want to watch episodes in sequence, not just the last ones added. The same goes for a large number of episodes of a single podcast. However, I’ve found a use for this option that makes sense.

I’ve got probably 10 movies that I haven’t watched. Most are old rips that I just haven’t been in the mood to watch yet. The more interesting ones happen to be the latest added, so for movies on my Apple TV, I’ve reversed my normal operation and now sync the last 3 added (or 3 “most recently unplayed”) movies. This is much better. Once I’ve run through them, the older ones will come back until I finally relent and watch them too.

I didn’t think I’d ever find a use for this option. It’s nice to see that it is workable in some situations.