Taggin’ with Louis C.K.

17 December 2011
Louis C.K. Live at the Beacon Theater

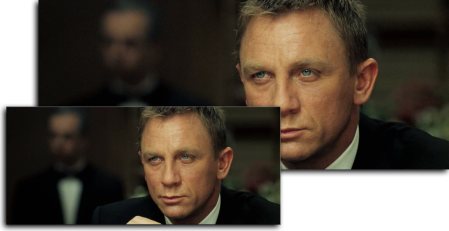
Louis C.K. Live at the Beacon Theater. Click to enlarge.

I just got on this bandwagon. Louis C.K. is doing something pretty special with this special. I bought it, expecting to download an SD 640 x 360 video file, probably in H.264. I was pleasantly surprised to find that there were two sizes available, 720p and a just-under-NTSC 800 x 448 SD version, both in an iTunes-friendly H.264/AAC format. I downloaded both. They were not prepared for iTunes, so I figured this was a perfect opportunity to create a tutorial on the subject.

The two files will become what I call a “HD•SD” package, which is an iTunes Store standard that includes a 720 HD file and an SD file. They appear as one item in iTunes with a HD•SD badge:

Appearance in iTunes

Appearance in iTunes

Mr C.K. was canny enough to provide an actual DVD label on his site, so I didn’t have to cobble together art. I downloaded the PDF, cropped it, resized it, added a little black at the bottom to get my 1000 x 1500 pixel ratio, and saved it as a new file. You can download it from here.

We then open both files in Subler. Edit one, then copy the tags to the other. I’ll start with the HD version. Click the Other Settings tab:
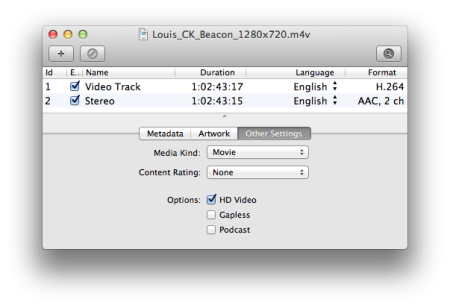
Editing, Stage 1

Editing, Stage 1

Change the Media Kind to Movie. Because this is the HD version, check the HD Video checkbox.

Click the Artwork tab and drag in your edited artwork file:
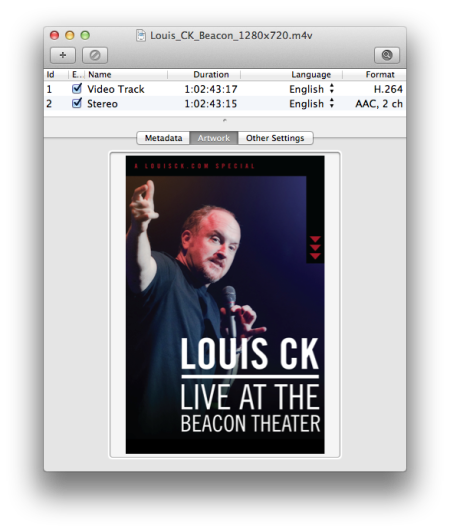
Editing, Stage 2

Editing, Stage 2.

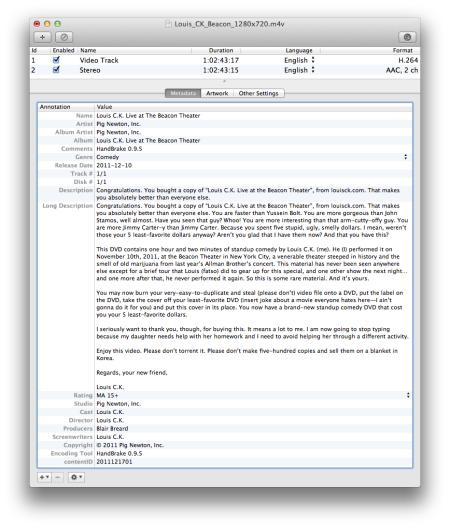
Finally, we fill out the tags. Special notes:

  • All the data for the tags came from Louis’ site and the DVD label. You can download a PDF from here that contains all the data for the below tags.
  • The Artist, Album Artist and Studio are all the same: the name of the studio, in this case, Pig Newton, Inc.
  • I like to put the encoding tool in the Comments tag so that I can use playlists to find videos encoded with HandBrake 0.9.5 (you can’t use the separate Encoding Tool tag as a criterion). Interestingly enough, Encoding Tool was the only tag these files originally had, and the value was HandBrake 0.9.5, so Mr. C.K. uses the same tool that I do!
  • I’ve used the Australian rating that I guessed applied, which is MA15+. Choose the appropriate rating for your country.
  • The tag contentID is a unique code that the two files must share. iTunes sees this code and knows that it must bundle the two files together. I use the date, followed by a sequential number, so for the first set that I tag on 17 December 2011, it becomes 2011121701. The second set of two will become 2011121702, etc.
Editing, Stage 3

Editing, Stage 3. Click to enlarge.

Do the same process for the SD version, except you won’t check the HD Video checkbox. Select All of the tags in the Metadata tab, copy and paste into the other window. Save both and drag them into iTunes where they will be filed appropriately.

I tested the files, too. The HD version works on the old Apple TV, the Apple TV 2 and the iPad (and will also work on the iPhone). The SD version will not sync to a Classic, unfortunately, but given that I never watch movies on my Classic, it’s no great loss. You’ll use the SD version on your iPhone or iPad to save space.

I hope this is useful to all who buy the special and is my contribution (other than payment) to Mr. Louis C.K.’s grand experiment.

Roll Your Own Anamorphic iPod-Compatible Videos from Blu-ray

27 August 2011
HD and SD Versions

HD and SD Versions (click to enlarge)

My job has changed recently and now involves travel, so suddenly I have a use for SD versions of videos. Previously I would only rip a HD version of a Blu-ray.

The iPod Classic is the reference device for SD video in the iTunes ecosystem. It has an ostensible limit of 640 x 480 pixels. This can be stretched to 855 x 480 with the anamorphic flag switched on. This is possible to do with anamorphic DVDs in HandBrake.

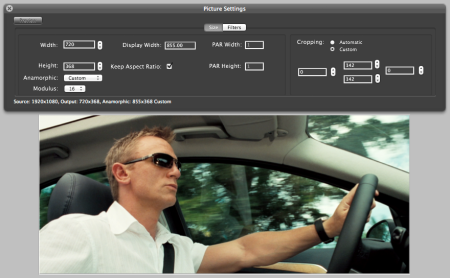
However, Blu-ray is natively widescreen, 1920 x 1080, so there’s no such thing as anamorphic ratios. In order to produce an iPod-compatible anamorphic video, you have to tweak the dimensions. Here are the settings for this movie, which is in an aspect ratio of 2.40:1:

HandBrake Settings

HandBrake Settings (click to enlarge)

I used the Universal preset. The result:

Result in iTunes

Result in iTunes


Anamorphic Video on iPod

26 November 2008

I’ve been experimenting with anamorphic video. I read after the 2007 models came out that they supported anamorphic video, so the maximum matrix of 640 x 480 pixels can be used to squash a widescreen video with an anamorphic flag, so the iPod, iTunes and Apple TV would interpret it as roughly 855 x 480 pixels. Obviously the iPod would have to shrink this to 320 x 160 or so for its built-in screen.

Problem is, the results are disappointing. These two screenshots are from the same content and the exact same frame, Lemon Jelly’s ’64-’95 DVD:

'64-'95 DVD (720 x 400)

Lemon Jelly: '64-'95 DVD (720 x 400) (Click to enlarge)

'64-'95 DVD (854 x 480)

Lemon Jelly: '64-'95 DVD (854 x 480 anamorphic) (Click to enlarge)

Lots of ugly artefacts in the anamorphic version. There are also frequent failures to resolve detail, with the effect that spots of the video suddenly go out of focus for a few frames. Movement has the occasional judder or skip. These are all present in non-anamorphic iPod rips, but far less frequent or noticeable.

I also did test rips of Sigur Ros’ Heima. What’s most disturbing about the results is the fact that the source in both cases is pristine, some of the highest bitrate, cleanest, most perfect DVD I’ve ever seen. If I ripped trash as anamorphic, the effect could only be more pronounced.

So I don’t think anamorphic is for me, despite the unassailable coolness this brings, especially as the increased resolution makes it more attractive for both iPod and computer/Apple TV use, perhaps leading to one version, not two.


Don’t Underestimate the Mac Mini

21 April 2008

Last year I upgraded my G5 to improve iTunes performance. As noted in that post, I achieved only moderate performance gains. The G5 was always pretty good at encoding with Handbrake, but now that I have added a number of tweaks to get better quality output, it was taking a very long time to encode video (about 18 hours for a 22-minute TV episode). That’s a little non-viable.

I was impressed that my MacBook Air was ripping video slightly faster than the G5. It’s Apple’s slowest machine, at 1.6GHz. I started to think that a Mac Mini would give me modest improvements on that, and because I appeared to have some hardware issues on the G5 with USB ports going offline, system lock-ups, etc., I decided to replace it now with a Mac Mini rather than wait for the next update to the line.

Given that I have plenty of external storage and an external DVD drive, I decided to save a little money and bought the entry-level 1.83GHz model, with 80Gb hard drive and combo optical. This is the slowest desktop Apple currently produces, so I wasn’t expecting it to be much better than the G5. It turns out that with most operations (opening windows, navigating through iTunes, etc.) it isn’t much different. I was starting to get a little buyer’s remorse when I ripped a TV episode to test it.

I had to check very carefully that it had produced a playable file of the entire episode because it ripped it about 5 times as fast as the G5! I was astonished at the difference, so impressed in fact that I considered buying another one just to rip video. It turns out that the MacBook Air was turning off one of its cores under the load of ripping, thus accounting for the lacklustre performance compared to the only slightly faster Mini.

Of course it comes five years of development time after the G5, so that dampens the surprise a little, but I think this proves that the Mac Mini is a pretty good performer despite its position in the product hierarchy, and you should consider it.


Apple TV 2.0.1: Small But Nice Enhancement

5 April 2008

Do you pause a video while playing just to see how much time has elapsed or how much time is remaining? I just noticed with 2.0.1, if you click the up button while playing, it displays the progress bar with the aforementioned times without interrupting playback. Small but nice enhancement.

Of course, I would prefer that the up and down buttons would change volume because my stereo remote is huge. I know why it doesn’t, though: it would require a variable line-out and volume is supposed to handled by the amp.

Update: I should have mentioned that if you’ve encoded your video with chapters using Handbrake, this tip will allow you to see the chapter titles, in addition to the times. It’s a small feature that DVD can’t match.


New Music Video Standard

26 November 2007

Yes, I’ve changed again. I follow Apple’s lead. They believe in H.264, so I do too.

The main reason I was using MPEG4 instead of H.264 was an incorrect assumption that 720 x 400 (16:9) was only iPod compatible if the file was MPEG4. I believe I would have tested this resolution with H.264 in the past–I always test–and would have found it incompatible, so I went with MPEG4 instead. Well, I’ve just done another test with four videos and lo and behold, it worked. This means that they upgraded the standard or that my earlier testing was poor. Either possibility is reasonable.

So what does this boil down to? Music videos are now specified as follows:

  • H.264 @ 1500kbps, 640 x 480 (4:3), 720 x 400 (16:9)
  • AAC @ 128kbps

If the source is a video file from an enhanced CD or the web, I don’t get fancy: I open in QuickTime Player and export to iPod. If it’s letterboxed (bane of the video collector’s life), I use MPEG Streamclip to achieve the same result, only I also crop the margins off (QuickTime Player can’t easily do this).

If the source is DVD, Handbrake is of course employed. I start with the iPod High Rez setting, then add 2-pass and greyscale (if appropriate). For audio, you can actually convert 5.1 to Dolby ProLogic II and the iPod will support it. Of course, you’ll only hear the stereo on an iPod, but this is good for using on both iPod and Apple TV, which might be connected to equipment that can support it. It does make a difference and is quite nice to listen to.

Handbrake 0.9.1’s new enhanced chaptering facility, where you can now name the chapters, is a great excuse to rerip video, and I especially like to rip long-form video such as concerts, Enigma’s A Posteriori DVD, Lemon Jelly’s ’64-’95 DVD, Bowie’s Ziggy Stardust and the Spiders from Mars: The Motion Picture, etc. with the proper chapter markers. Strangely, the Touch, where I play music video the most, does not display the chapter names. If you tap the screen while a video is playing, it will say Chapter X of X, but doesn’t display the name. Apple has been notified.

Don’t muck with the advanced settings. They’re very good for tweaking video intended for the Apple TV or computer, as these devices are tolerant, but I’ve found that changing the slightest setting will prevent the video from transferring to an iPod (see my earlier post on this matter). You have to stick with stock-standard iPod settings to guarantee compatibility.

So I’m going to start ripping my music video again. The amount of work this entails is made palatable by remembering that I’ve got a number that don’t work with the new iPods and of course, my favourite, the chaptering excuse!


Video for the New iPods: Compatibility or Quality?

5 October 2007

The type of content I’ve most enjoyed on the Touch so far is music video. I’ve filled mine about 75% with music video which I watch at work. As I have 414 separate videos, I’ve been rotating them through and one thing has become clear: compatibility is more important than quality, especially if the prime target for viewing this content is an iPod. I’ve just had a batch of MPEG4-encoded videos, all of which played on my 5th-Gen, fail to display video on playback on both the Touch and Classic. Audio is fine, just no video. I think this is because I used to push the envelope, encoding at 1500kbps MPEG4, which is the highest MPEG4 video bitrate the iPod can support, and also because I made 16:9 videos 720 x 400 pixels instead of the iPod standard of 640 x 360. Result is incompatibility or, at best, borderline compatibility.

So I’ve made the decision to make every music video iPod-compatible. It will result in lower-resolution 16:9 videos but honestly, I can’t be bothered trying to push the envelope any more. I’ve got too much on and I’ve been enjoying the iPod quality. QuickTime Player or iTunes will convert a non-DVD video between 320 and 640 pixels wide into a H.264 video with the same resolution. Handbrake 0.9’s new GUI access to the command-line parameters gives much better results. The new chaptering feature adds another reason to redo your long-form video.

So that’s my advice to you. This of course applies to any content targeted at an iPod. I still rip DVD movies and TV Shows at a much higher quality because they are aimed at Apple TV.


What About Music Video?

18 June 2007

I have mentioned that although I’ve abandoned the iPod with regard to movies and TV shows, I still rip music videos for the iPod, because I do take that content on the road with me. With all the Apple TV evolution that’s been going on recently, I changed movies and TV shows from MPEG4 to H.264. Apple TV can support up to 5000kbps H.264 and 3000kbps MPEG4. This is the reverse capability of the iPod, which can handle 2500kbps MPEG4 but only 1500kbps H.264.

After a bit of tweaking, I abandoned the hope of defining a high-bitrate H.264 standard. The MPEG4 at 2500kbps is much better, so that’s the new standard. 160kbps AAC is the audio setting. The resolution is still 720 x 400 for 16:9 and 640 x 480 for 4:3.

With iPod season approaching (September/October), I don’t feel like sweating too hard over music videos. Hopefully we’ll get our video iPod and one has to assume that it will support higher bitrates, so I’ll feel compelled to do it all over again.

There is a special consideration when ripping music videos from DVD. Often the videos are mixed aspect ratios, i.e., some will be 4:3, others will be 16:9. Rarely will a set of music videos appear as anamorphic 16:9. This means that the widescreen videos will be 4:3 letterboxed and a top and bottom margin will need to be cropped. Also, I’ve noticed that usually the videos will be structured as chapters of an overall title, rather than as separate titles. This is where Handbrake falls down. You can specify a single chapter of a title to be ripped, but the all-important preview, where you crop the image to size, will only give you samples from the entire title. This often means that you won’t get a frame from the video you want to rip and therefore can’t see what you are doing. You can guess but you may have to rerip a specific chapter this way. Another issue with ripping individual chapters is that Handbrake often puts a few frames of the following chapter on the end of the chapter you are ripping, which requires that you trim off the end with a tool like QuickTime Player.

Another approach is to use another application to create a separate .VOB file for each chapter. The best one on Mac OS X is the graphically spare but dependable 0SEx. I then use MPEG Streamclip to output to MPEG4. You can crop and do a lot of other cool things to the video with this application, and it’s available for both Mac and Windows.

So there are some thoughts about ripping music videos. It takes a bit of work. I’m hoping that Handbrake updates bring better support for individual chapters in the future. Until the next iPod arrives, I think I’ll put most music videos on the back burner.


iPod Left Behind in Wake of New Handbrake Features

3 May 2007

Apple TV has spoiled me. It’s so nice to watch DVD-ripped content on my 32″ screen that I’m not keen to watch it on my iPod. Major feature updates in Handbrake 0.8.5b1 have rendered the iPod virtually irrelevant in the ripping equation.

Anamorphic: Stunning, stunning feature. MediaFork had this but apparently QuickTime didn’t support it. Now Handbrake can create QuickTime-compatible anamorphic video. That means you don’t have to lose any resolution. This works with both 4:3 content (translates to 768 x 576) or 16:9 (translates to 1024 x 576) (these are from PAL discs). It rips the full 720 x 576 resolution and sets the display size to the appropriate value. Works in iTunes, QuickTime Player and Apple TV. Video quality is much better because now you’re only at war with artifacts, not resolution downsizing as well.

One of the best reasons for ripping for iPod was the opportunity to crop off the black margins. Because Apple TV overscans anyway and because it would mean a loss of resolution, I don’t crop anymore. This has made the setting up of Handbrake scans very fast.

Multi-Channel Sound: Handbrake can now create Dolby ProLogic and 5.1 AAC audio mixes, if the DVD has it. My audio equipment is not really up to testing this, however, so I’m in two minds about using multi-channel sound. Most of the DVD content I rip is TV shows, because that’s what I’m into, but also because they are almost always stereo. Because Handbrake used to only output stereo, I didn’t rip any multi-channel audio DVDs.

Finally, chaptering is supported and works on all three platforms. Unfortunately, there’s no way to name them, which is more important with movies and music videos, but it’s a start. I really need an MPEG4 chaptering tool that can chapter .mp4 or m4v files, not .mov, for which there are some. I don’t use .mov, even though the codecs are the same. .mov is not taggable in iTunes beyond simple text fields, and iTunes can only write them to the database, not the file.

I still rip music video for the iPod, as I do watch this “on the road”. The only other video content I watch on it are one or two EyeTV-recorded TV shows and mostly video podcasts.

Thank you Handbrake. Thank you very much.


Basic DVD-Ripping Steps

20 April 2007

May 3 2007: Note: The video specs are now out of date, but the outline of the procedure is still the same.

I should get on with some video-ripping specs. This is the broad outline. I’ll get specific later.

Ripping

Start with Handbrake or MediaFork. Both are essentially the same application. MediaFork is slightly more configurable. Rip using the following specs:

Video

  • H.264 (main): 2500 kbps
  • 2-pass encoding
  • If a grey-scale movie, check Gray Scale
  • 4:3 content: 640 x 480
  • 16:9 content: 720 x 400

Audio

  • Stereo option, if available, otherwise 5.1 will be down-mixed to stereo
  • 192 kbps

Tagging

Next step is tagging. We use Lostify for this. Once done, drag into iTunes.

Cover Scan

Scan the cover of the DVD and add this to each track, if from a movie or music video DVD, or the image pane of the first episode in a season if a TV show

TV Show “Album Art”

For TV shows, we use a frame that best describes the episode for individual “album art” on each. Using QuickTime Player, open each video file and copy a frame. Save these in JPEG format.

In iTunes, open each episode one by one and replace the automatic album art with the appropriate frame. For the first episode of any season you will get two images for that episode–the DVD cover and a frame.

There’s a lot of detail to each step but I wanted to blurt out the overall procedure before getting technical.